|
LinksPro Manual
|
|
Installation
1. Installation & Installation Requirements
· 1.1 Installing the Application - Quick Setup
· 1.2 Installing the Application - More Detailed
· 1.3 Database Requirements
· 1.4 SQL Server Requirements & Installation
· 1.5 Email Component Requirements
· 1.6 Troubleshooting
·· 1.6.1 Permission Denied or Operation must use an updateable query
·· 1.6.2 Data source name not found and no default driver specified
·· 1.6.3 The transport failed to connect to the server
·· 1.6.4 error '8004020e'
·· 1.6.5 General Email Problems "Error Type: Email Problem"
2. Checklist & Further Help
· 2.1 Web Server
· 2.2 Browser Problems
· 2.3 Questions people have asked
3. Support
· 3.1 Technical Support
· 3.2 Customization
· 3.3 Feedback & Suggestions
Administration
4. Main Areas & Functions
· 4.1 Login & Summary Screen
· 4.2 Links & Categories
· 4.3 Category Add/Edit
· 4.4 Link Add/Edit
· 4.5 Ratings Listing
· 4.6 Ratings Add/Edit
· 4.7 Reviews Listing
· 4.8 Reviews Add/Edit
· 4.9 Links/Ratings/Reviews Waiting Approval
· 4.10 News Listing (Ultimate Version Only)
· 4.11 News Add/Edit (Ultimate Version Only)
· 4.12 Custom Pages Listing (Ultimate Version Only)
· 4.13 Custom Pages Add/Edit (Ultimate Version Only)
5. Email Management: Templates & Sending Bulk Email
· 5.1 Email Template Selection - example 1
· 5.2 Email Template Selection - example 2
· 5.3 Email Preview & Select Recipients
· 5.4 Emails Sent
· 5.5 Email Templates Listing
· 5.6 Email Template Add/Edit - example 1
· 5.7 Email Template Add/Edit - example 2
6. Payments (Ultimate Version Only)
· 6.1 Incomplete Payments / Submission
· 6.2 Subscriptions Renewal Summary
· 6.3 Subscriptions Requiring Deactivation
· 6.4 Payments Log / History
· 6.5 Payments Add/Edit
7. Configuration Settings
· 7.1 Configuration Settings Listing
· 7.2 Configuration Edit
· 7.3 Configuration Advanced Options
8. How Do I...
· 8.1 Turn my site into a Business Directory?
· 8.2 Let people submit free?
· 8.3 Let people submit free, if they link back to my site? (Ultimate Version Only)
· 8.4 Let people pay to submit to my site? (Ultimate Version Only)
· 8.5 Let people pay a recurring fee? (Ultimate Version Only)
Terms & Conditions of use
9. End-User License Agreement
· 9.1 Software Product License
· 9.2 Grant Of License
· 9.3 License Fees
· 9.4 Limited Warranty
· 9.5 Breach Of Limited Warranty
· 9.6 Limitation Of Liability
· 9.7 Termination
· 9.8 Copyright
· 9.9 Additional Right And Limitations
· 9.10 Thumbshots Thumbnails
|
|
|
Installation
|
|
1. Installation & Admin
|
|
|
1. Upload all the files to your web site, maintaining directory structure.
2. If using MS Access skip to Step 3, if using SQL Server, run the included 'sqlscript.sql' file in Enterprise Manager/SQL Server, to create the database structure first.
3. File Permissions: Make sure the entire LinksPro directory, subdirectories and all files has Modify Permissions (read,write,change). If you get "Permission Denied" errors on install/during use, this means you don't have the correct permissions set. Contact your hosting provider if you have file permission problems, they will be able to directly help/resolve this matter for you.
4. Navigate to 'install.asp' in your browser found in root of your LinksPro web site.
5. Follow on screen instructions, fill in the critical database settings, press Install Now.
6. Done.
|
|
|
|

|
1. Unzip the 'LinksPro.zip' file & copy/upload the entire directory structure to your web server in the subdirectory 'LinksPro'.
2. If wanting to use SQL Server (if not skip to step 3), run 'sqlscript.sql' found in the root of the LinksPro site, this will create the database structure in its entirety (see 2.2 SQL Server Requirements & Installation, for detailed explanation).
3. Set Modify Permissions to the entire structure of LinksPro (files & directories)
4. Run http://www.yourwebserver.com/linkspro/install.asp - this will start the 'install' process.
5. Fill in your Database Connection details, read on-screen information for further help.
6. Click 'Install Now'.
7. If you have entered your details correctly you will have a confirmation message, advising you to go into the admin panel, to alter any further details such as, links to show per page, or site colors/titles.
8. Your installation is complete.
|
|
|
|
This application can use the following databases.
1. MS Access 2000+
2. SQL Server 7
3. SQL Server 2000
4. SQL Server 2005
5. SQL Server 2005 Express
MS Access database - Does NOT require a copy / license of Microsoft Access.
SQL Server 7, 2000 & 2005 - DOES require a copy / license to use.
2005 Express - Does NOT require a license, this is a free version of SQL Server from Microsoft.
SQL Server 2005 Express Download.
http://msdn.microsoft.com/vstudio/express/sql/download/
|
|
|
|
You need to run sqlscript.sql to create your database, please use the below as guide.
What does the 'sqlscript.sql' do?
1. Installs all tables to Master database.
2. Installs the tables with a prefix of 'codefixerlp_' so easily identifiable.
If you want to install into a different database or you have specified a different table name prefix then see Step 1, else skip to Step 2.
Step 1 - Edit (skip if you haven't/don't wish to change standard database prefix settings)
a. Edit the "sqlscript.sql" in notepad, search & replace all occurrences of 'codefixerlp_' to a new table name prefix.
b. Visit the file includes\cInstall.asp, and navigate to around line 48 to alter the following
s_SDDefaultValuesCommon.Add "TableNamePrefix", "codefixerlp_"
to
s_SDDefaultValuesCommon.Add "TableNamePrefix", "MyNewTablePrefix"
This will alter the default table prefix by default for any reinstalls of this application.
Step 2 - SQL Server Enterprise Manager (SQL Server 7, 2000 connectivity tool)
a. Open SQL Server Management Express & connect to your database.
b. Go to the Tools menu in & select SQL Query Analyzer.
c. In SQL Query Analyzer, select the File menu & Open, select the 'sqlscript.sql' file & open it.
d. Press the Green Arrow, or press F5 to Execute Query.
or
Step 2 - SQL Server Management Express (2005 & 2005 Express connectivity tool)
a. Open SQL Server Management Express.
b. Go to File > Open > Open - select "sqlscript.sql" to load.
c. A dialogue will ask you to connect, select which database details & connect.
b. Click on Tables to view the current tables in your database.
d. Press F5 to execute or Right click on new window & select Execute.
The database tables should be created in your database & ready for use.
You need a SQL Server username & password to access the database through LinksPro that should be entered in the connect string when completing 'install'.
|
|
|
|
One of the following email components needs to be installed on your web server in order to use the email features of this software product.
An SMTP server is also required. We recommend you use CDOSYS from the below.
1. CDOSYS (microsoft.com) - Enabled by default on Windows 2000, Windows XP Professional, & Windows Server 2003 operating systems.
2. CDONTS (microsoft.com) - Included with Windows NT 4.0 SP3+ & Windows 2000 operating systems.
3. ASPMail (Serverobjects.com) (not to be confused with ASPeMail by Persists)
ASPMail is a third-party mail component in use by many ISP's; it does not come with the Windows Operating Systems as standard. CDOSYS & CDONTS are standard.
The software can be modified to support other components upon request.
|
|
|
|
1.6.1 Permission Denied or Operation must use an updateable query
'Permission Denied'
or
Microsoft OLE DB Provider for ODBC Drivers error '80004005'
[Microsoft][ODBC Microsoft Access 97 Driver]
Operation must use an updateable query.
Solution
The Internet Guest account (IUSR_MACHINE) MUST have Modify permissions on the following
1. db.database (Access DB).
2. categories (sub-directory & all files).
3. includes\includes.asp.
4. includes\config.asp.
5. admin\includes.asp.
For ease you can grant the entire LinksPro directory/structure modify permissions. This is usually only an issue on local servers, hosting companies will often have these permissions setup on all your files.
Please refer to http://support.microsoft.com/kb/q175168/ or contact your hosting company to set the correct permissions.
1.6.2 Data source name not found and no default driver specified
Microsoft OLE DB Provider for ODBC Drivers error '80004005'
[Microsoft][ODBC Driver Manager] Data source name not found and no default driver specified
/linkspro/includes/cDataSource.asp, line 31
Solution
Your database connect string is incorrect, this could be to do with the server name you specified (local or IP), or less likely it could be security restrictions.
1.6.3 The transport failed to connect to the server
CDO.Message.1 error '80040213'
The transport failed to connect to the server.
/linkspro/includes/cEmail.asp, line 407
Solution
Your Email Server (SMTP) is incorrect in Settings, please check & possibly contact your ISP to find out the correct setting.
1.6.4 error '8004020e'
error '8004020e'
Solution
Your Email Server (SMTP) is incorrect in Settings, please check & possibly contact your ISP to find out the correct setting.
1.6.5 General Email Problems "Error Type: Email Problem"
You possibly will get email error messages of differing types, depending on what email server you or your web host is using
Solution
There is a description included for email problems, this description will indicate what the problem is, it could be something like
Description: The server rejected the sender address. The server response was: 530 Authentication required
This means that this server requires you to provide a username and password - LinksPro configuration has an Email Username, Email Password setting for you to fill in (many email servers wont require authentication). The best way to solve email problems is with a bit of trial and error and reading the description of the error messages, and of course post your error message on our support forum for further assistance.
|
|
|
2. Checklist & Further Help
|
|
Having problems? then run through this check list, 9 out of 10 times you won't need to, but if you're having problems please make sure your web server/host has the below installed & setup properly.
|
|
|
|
LinksPro is written in ASP, VBScript. No Active X DLL components need to be installed. The following standard IIS services are required however.
IIS
Requires an ASP enabled web server - Microsoft IIS 4 or above.
If unsure your Web Host supports this, read their FAQ or email their technical support.
Operating Systems that support IIS
http://www.codefixer.com/tutorials/iis_pws_operating_systems.asp.
Test your Web Hosting runs ASP
http://www.codefixer.com/tutorials/test_server_supports_asp.asp.
MDAC
Microsoft Data Access Components (MDAC).
MDAC version 2.5 or later recommended, free download
http://www.microsoft.com/data.
XML Parser
The Microsoft XML Parser (MSXML) which includes the XMLHTTP Request object.
Test your Web Hosting runs XMLHTTP
http://www.codefixer.com/codesnippets/installed_xmlhttprequest_object.asp.
FSO
The File System Object, used to read and modify text files.
Test your Web Hosting has the FileSystemObject
http://www.codefixer.com/codesnippets/filesystemobject_installed.asp.
|
|
|
|
Please make sure you have session cookies enabled on your browser otherwise this script will not work.
This application has been tested on IE, Firefox, Opera & Netscape browsers.
It is XHTML V1.0 Transitional compliant, for maximum multiple cross platform compatibility.
|
|
|
|
Q. How do I get this site up on to my web hosting/server?
A. If uploading to a remote/web hosts server you will need an ftp client. Download one of the following, & read its included instructions.
1. WS_ftp - http://www.ipswitch.com.
2. Filezilla - http://filezilla.sourceforge.net.
Q. Does it run on Access 97 or SQL Server 6.5 & below?
A. Not Sure, why don't you try it & let us know on the forum? (see 4.1 Technical Support) We value your input & involvement.
Q. Why is the MS Access database named db.database?
A. The Access database is provided in the root of the site with the filename db.database, it is renamed as a security measure to stop direct downloading, if you want to edit it in access rename it to db.mdb. But remember to put it back to db.database when you're finished.
Q. I don't understand all this Database Connection String stuff, what am I supposed to be doing?
A. It can be fiddly & annoying to connect to databases in some circumstances.
Please visit the following which will guide you through it
http://support.microsoft.com/?kbid=193332
For further example database connect strings please visit
http://www.connectionstrings.com/
Q. How do I change the directory name? For instance if I wish to call the directory "demo_links" and install it in this directory?

A. You can do this in several ways
1. Change it initially once unzipped from the linkspro archive/zip file, then upload it, the automated install.asp pick up will do the rest.
2. If you change it once its installed via ftp or your directory structure. Run install.asp again from within the newly renamed directory and it will populate with all the correct settings.
3. If you don't want to lose all your existing settings, just changing your location, select New Directory / Website Location from the install screen (you must have already installed previously for this option to be visible/available).
Q. I don't understand the email system. What do the header, content and footer mean?
A. Header, footer and content are just ways to divide up the template, it does all join together ultimately, but it's a way to better manage them. As often a graphical template is done by having the header and footer wrapping around some kind of content in the middle.
Also, it allows you to copy and paste headers from one template to another quickly without having to sift through the entire html page, headers are often reused many times, but with different contents.
|
|
|
3. Support
|
|
|
For technical support please visit our support forum, and post any problems or errors you have there. These forums are moderated by the makers of this application and will be responded too and resolved in a timely fashion.
Please post your comments on our support forum.
http://www.codefixer.com/forum/default.asp
|
|
|
|
For customization please contact sales@codefixer.com.
LinksPro for FREE
When you spend over 1900 dollars on customizations we will give you the license absolutely free, saving you 249 dollars.
Discounted Web Design Rate
We offer discounted web design rates for customizations on the LinksPro product, contact us now for a quote, you'll be pleasantly surprised at the price.
Bulk Discounts
We offer discounts for bulk licenses/copies.
Drop us a line at sales@codefixer.com with your ideas and needs, we'll happily give you a quote.
|
|
|
|
In order to improve our product & services we would appreciate any feedback or suggestions that you wish to give. These forums are moderated by the makers of this application, all of your suggestions will be read and included in future versions if possible.
Please post your comments on our support forum.
http://www.codefixer.com/forum/default.asp
|
|
|
Administration
|
|
|
Links & Categories
Add/Edit/Delete categories and links found on your site. This is the main area to manage your site.
Payments
Site Finance management area, Add/Edit/Delete payment histories, payment details & subscriptions.
» Incomplete Payments / Submission
Lists all submissions that didn't complete the payment process. These submissions have been added to your site, but the customer withdrew from the payment process, or the customer had a problem with authentication.
» Subscriptions Renewal Summary
Lists recent renewal dates of any subscription payments. Use this section to ensure people are paying you on time or notifying people they have missed payments.
» Subscriptions Requiring Deactivation
Lists all subscriptions that have ended via cancellation, but are still set to active on your site. View this screen to deactivate all cancelled subscriptions.
» Payments Log / History
Shows a complete history of payments received by your site.
Ratings & Reviews
This section lists all ratings & reviews given for the sites content/links. You can Add/Edit/Delete ratings/reviews here and authorize any unapproved rating/reviews that require your attention.
News
Allows you to Add/Edit/Delete News items, to appear at the top/home page of your site keeping patrons advised as to special events or exciting developments.
Custom Pages
LinksPro gives you complete flexibility in how you want to run your site, by allowing you to create custom html pages as and when you like. These pages will appear above the normal main menu, you can Add/Edit/Delete them using the inbuilt html WYSIWYG editor, as if you were using a stand alone web design tool.
Email Management
Manage the look & feel of any emails sent through LinksPro itself, as well as using the inbuilt bulk mailing list system to manage & conduct promotions promotions.
» Send Email/Bulk Email
Send a singular email, or a bulk email to all of your customers. You can create your email from scratch or load an existing template.
» Email Templates
Add, Edit or Delete Email Templates for common reuse. Allows you to design emails in html, with header, content and footer sections, saving time if commonly mailing customers with similar information.
Home
The default page of the admin panel, summarizing the status & usage of the site.
Allows you to quickly see if any new links,ratings or reviews require your approval for activation.
Public Site
Takes you to the front of your LinksPro site.
Knowledge Base
Need help? Got a question about LinksPro? Got something new to tell us? Then visit our professionally moderated forums, the answer you are seeking may already have been answered, if not sign up to the forum & join in.
Settings
Configuration settings, change colors, site width, email settings, automatic link approval, notifications how many links to show per page etc. This section governs how your site operates, there are many settings combinations to choose from.
|
|
|
|
|
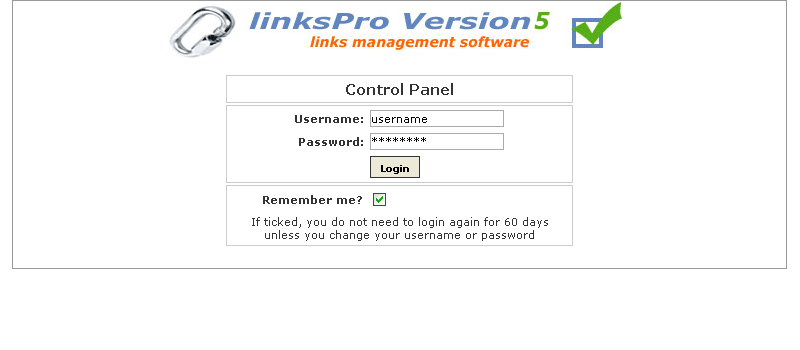
Once installed, you can login to the admin area on your site
e.g. http://www.yoursite.com/linkspro/admin/index.asp.
The default username / password are as below & but can be changed via the admin panel.
Username: username
Password: password
|
|
|
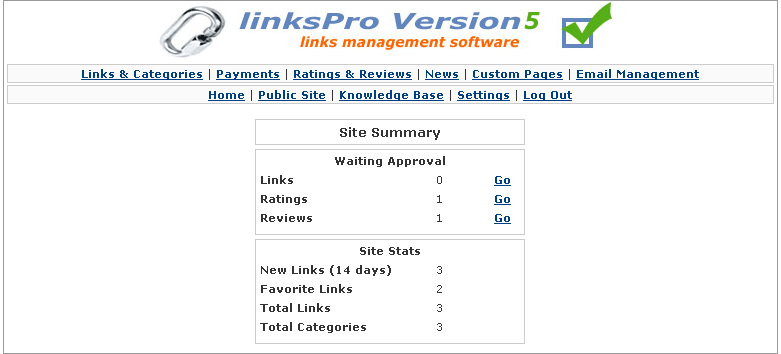
Main index page you are first greeted by when you login successfully. Here you will see summaries of site statistics and activities.
Waiting Approval
The number of Links, Ratings & Reviews that are unapproved and waiting for your review.
New Links
The number of new/recent links added to the system.
Favorite Links
The number of featured/favorite links as indicated by the green tick.
Total Links
Total number of links in the entire directory.
Total Categories
Total number of categories in the entire directory.
|
|
|
|
|
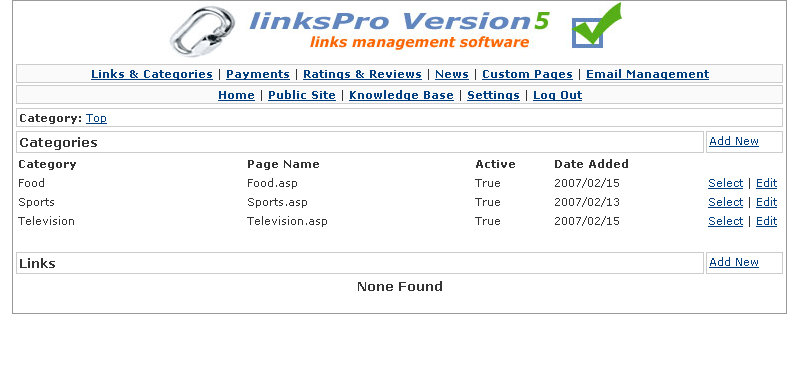
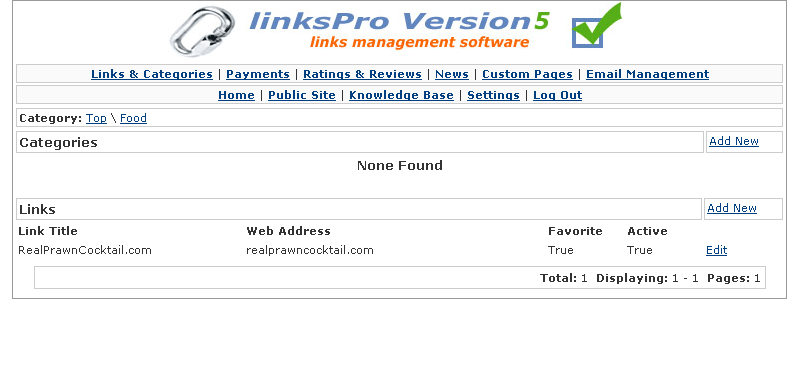
Lists the categories and links within these categories, this is the main admin area for governing site content.
Location bar/category
The top bar, under the menu, identified by 'Category: Top' is your current location within the directory. As you click on further categories this will change to show which category you are within. Clicking category names on this bar, will take you said categories, an easy way to navigate your way back up the directory, and remind you what your looking at.
Categories
By clicking select on a category or anywhere along a category line you will take you to that category, and see its contents, which may contain further categories and links, you navigate your way through the directory by clicking on categories.
Clicking edit will take you to that categories details page, where you may alter category name, description and other details.
Clicking Add New, will take you to a screen where you can add a new category and its details.
Links
Clicking edit or anywhere along the link line will take you to that links details page, where you may alter Link Title, description and other details.
|
|
|
|
|
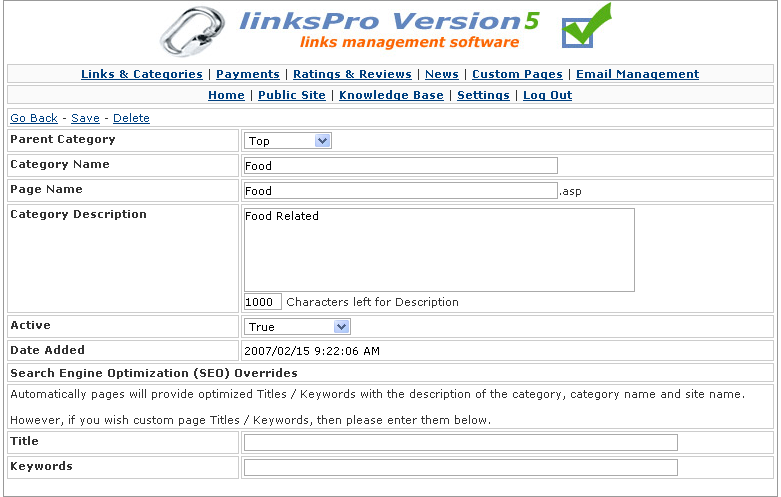
Allows you to add/edit categories within the directory.
Parent Category
The category that this category your editing/adding is within. If you want to change the location of this category within the directory, you may select a new one from the drop down, and it and all its contents will be moved.
Category Name
The name of the category.
Page Name
The page name of the category as stored on the hard drive. This must be unique and you will be told if it is a duplicate. File names are used to increase search engine optimization, the more pages with relevant words in the filename applying to the content of that file the better your site is ranked, very important.
Category Description
The long description of the category, that will appear when you hover over it, and underneath the category name if category descriptions are turned on.
Active
Activate or deactivate, if set to False, this will not be seen in the front of the directory, set to True it will be.
Date Added
The date and time this was added/created.
Search Engine Optimization (SEO) Overrides
Automatically pages will provide optimized Titles / Keywords with the description of the category, category name and site name.
However, if you wish custom page Titles / Keywords, then you can enter them in the provided fields.
Title
Page title as seen in the title bar of the browser.
Keywords
The keywords identifying the content of this category, separate with a space or a comma for better results.
|
|
|
|
|
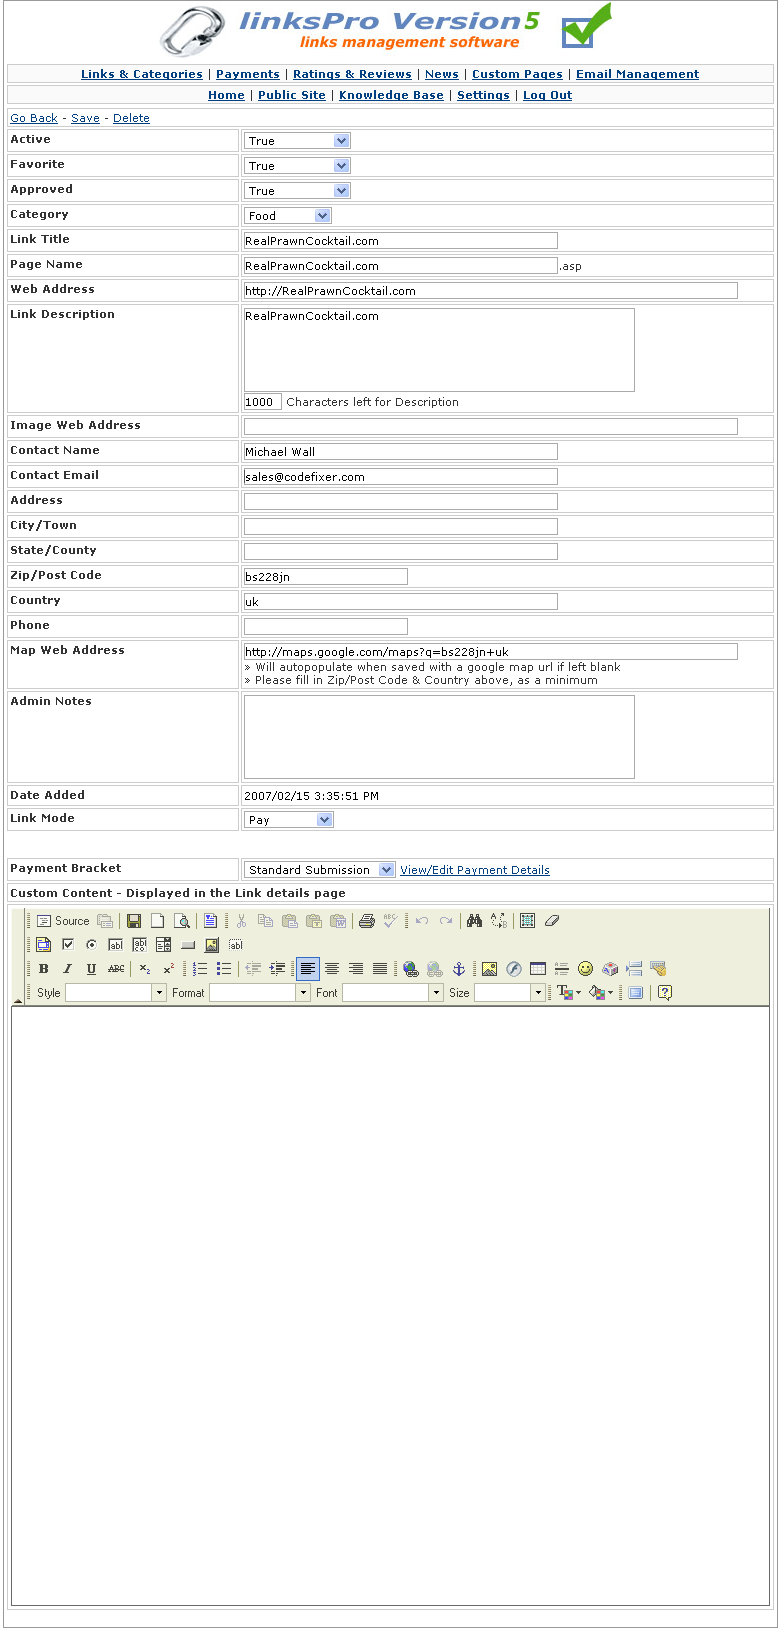
Allows you to add/edit links within the directory, will automatically detect which category you're within and assume you want to add the link there, unless you decide otherwise.
Active
Activate or deactivate, if set to False, this will not be seen in the front of the directory, set to True it will be.
Featured
Featured/favorite link as indicated by the green tick.
Approved
You have to approve links for them to show at the front of the directory, this can be set to automatic or manual in the 'settings' section.
Category
The category this link is within.
Link Title
The name of this link.
Page Name
The filename in which this page will be stored, this is important for Search Engine Optimization and is automatically created from the Link Title you specify. You can alter this yourself manually if you prefer a different filename, however all filenames must be unique in the system.
Web Address
The web site address this link directs too, people will be able to click on this link and visit it.
Link Description
The long description of web site/link, as seen in link listing and link details.
Image Web Address
The web site address of an image or logo that is associated with this link, this can be on your LinksPro site or at an external address.
Contact Name
The name of the person who submitted this link. Displayed publicly in the link details.
Contact Email
The email of the person who submitted this link. Displayed publicly in the link details.
Address
The address associated with this link/business. Displayed publicly in the link details if 'Business/Address Mode' is turned on.
City/Town
The city/town associated with this link/business. Displayed publicly in the link details if 'Business/Address Mode' is turned on.
State/County
The state/county associated with this link/business. Displayed publicly in the link details if 'Business/Address Mode' is turned on.
Zip/Post Code
The zip/post code associated with this link/business. Displayed publicly in the link details if 'Business/Address Mode' is turned on.
Country
The country associated with this link/business. Displayed publicly in the link details if 'Business/Address Mode' is turned on.
Phone
The phone number associated with this link/business. Displayed publicly in the link details if 'Business/Address Mode' is turned on.
Map Web Address
The web site address of a 3rd party map web page that is associated with the location of this link/business. The system automatically will create a Google Map based on postcode and country fields, however, if you wish to use another provider, you can edit the web address manually.
Admin Notes
Private notes about this link, not available to the public, for your own admin reference.
Date Added
The date and time this was added/created.
Link Mode (Ultimate Version Only)
» Free - This link was added free of charge, with no cost to the submitter.
» Reciprocal - This link was added with the condition that the submitter have a link back to your site/directory.
» Pay - This link was added with a charge to the submitter. This may have been a standard charge or a premium charge depending on your site settings.
Custom Content (Ultimate Version Only)
You can create mini-web pages for your links/businesses by adding custom content to the details page. This will appear under the general information about the link/business, there is a WYSIWYG editor for you to use built in.
|
|
|
|
|
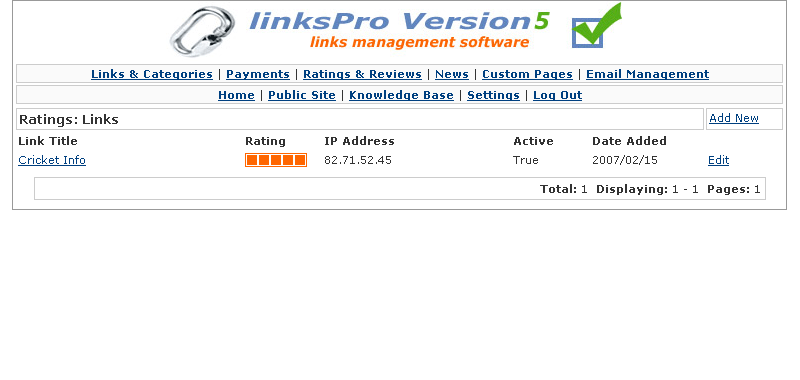
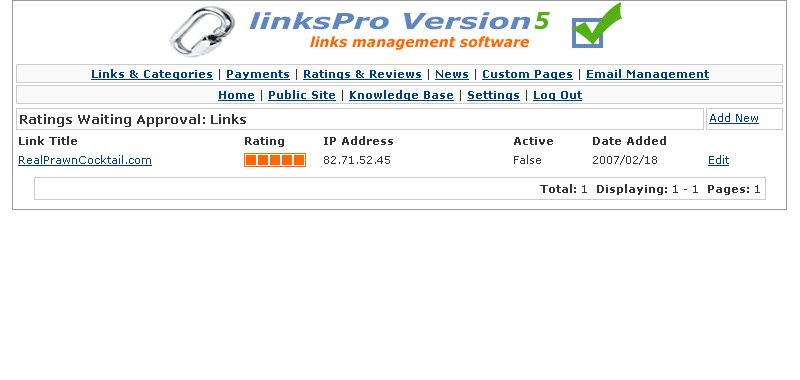
Lists the ratings currently given to links within the site.
Clicking edit or anywhere along the rating line will take you to that ratings details page, where you may alter rating value and active status.
Clicking Add New, will take you to a screen where you can add a new rating and its details.
|
|
|
|

|
Allows you to add/edit rating of links within this directory.
Active & Approved
Activate or deactivate, if set to False, this will not be seen in the front of the directory, set to True it will be.
Item To Rate
Name of the link this rating applies to.
Rating
Rating value, from 1 (low) to 5 (high).
IP Address
IP Address of the person who rated this link.
Date Added
The date and time this was added/created.
|
|
|
|

|
Lists the review currently given to links within the site.
Clicking edit or anywhere along the review line will take you to that reviews details page, where you may alter reviewer name, review, active status and other details.
Clicking Add New, will take you to a screen where you can add a new review and its details.
|
|
|
|
|
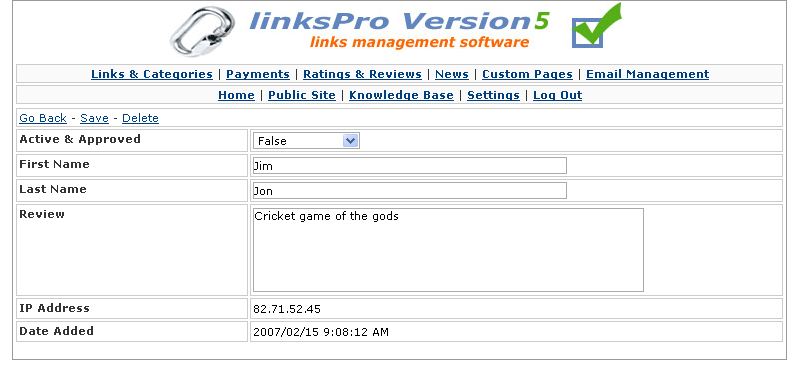
Allows you to add/edit reviews of links within this directory.
Active & Approved
Activate or deactivate, if set to False, this will not be seen in the front of the directory, set to True it will be.
First Name
First name of the reviewer of this link.
Last Name
Last name of the reviewer of this link.
Review
Descriptive review of this link.
Item To Review
Name of the link this review applies to.
IP Address
IP Address of the person who reviewed this link.
Date Added
The date and time this was added/created.
|
|
|
|
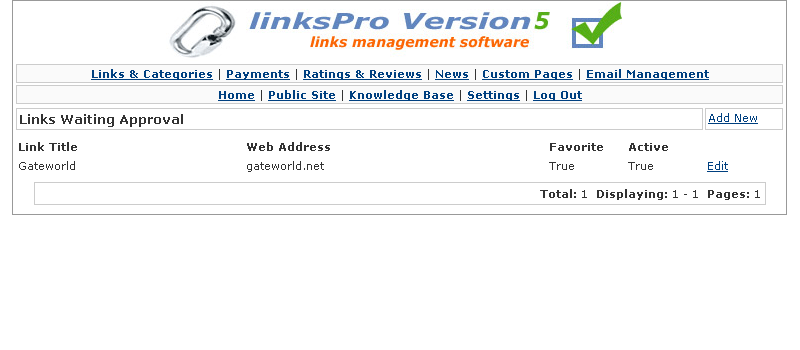
Links Waiting Approval
Ratings Waiting Approval

Reviews Waiting Approval
|
Lists the links/ratings/reviews currently waiting your approval before they become active in the front of the site.
Clicking edit or anywhere along the link line will take you to that links details page, where you may alter its active & approved status.
Clicking Add New, will take you to a screen where you can add a new link/rating/review and its details.
|
|
|
|
|
|
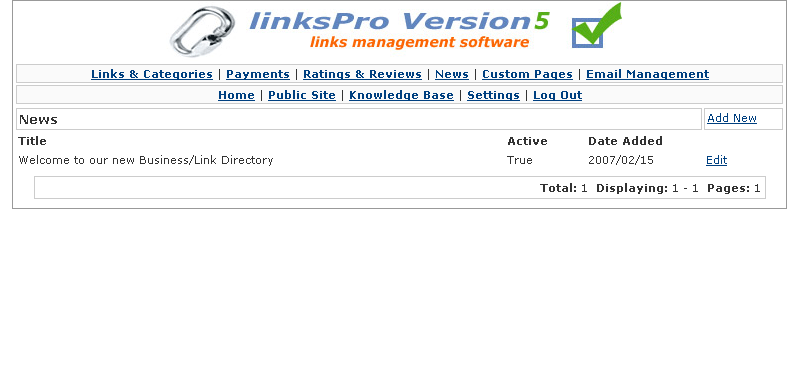
Lists the news items within the site.
Clicking edit or anywhere along the news line will take you to that news items details page, where you may alter the title, content and active status.
Clicking Add New, will take you to a screen where you can add a new news item and its details.
|
|
|
|
|
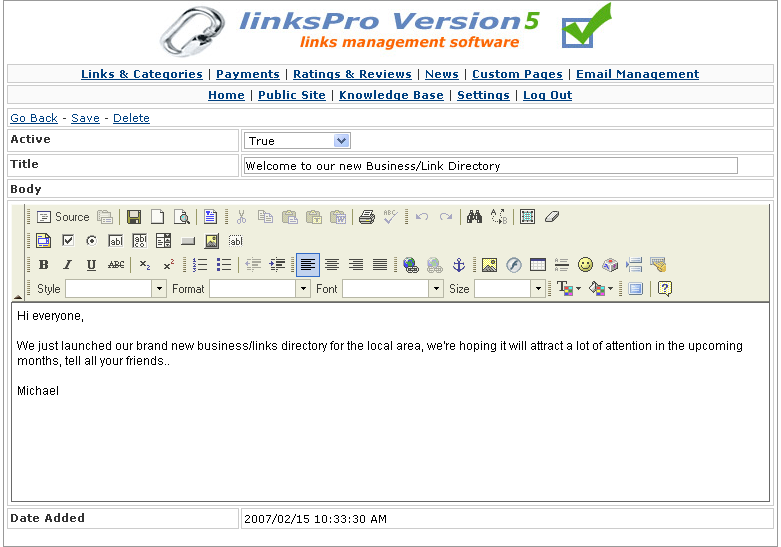
Allows you to add/edit news items.
Active
Activate or deactivate, if set to False, this will not be seen in the front of the directory, set to True it will be.
Title
The title of the news item.
Body
The main content/body of the news item, a WYSIWYG html editor is provided if complex articles requiring graphics is required, or you can just use simple text.
|
|
|
|
|
|
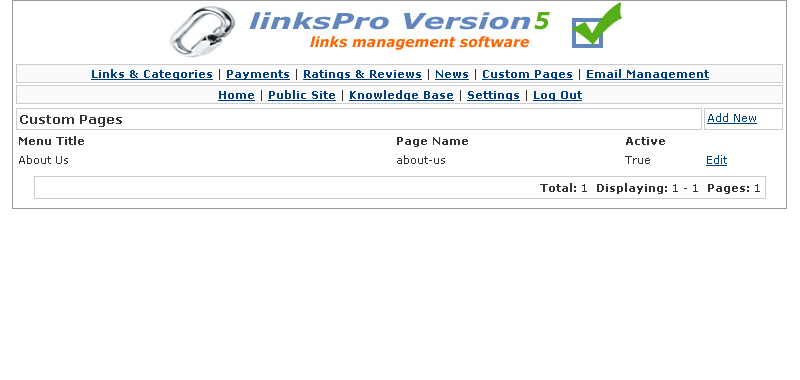
Lists the custom pages within the site.
Clicking edit or anywhere along the custom page line will take you to that custom pages details page, where you may alter the title, page name, custom page content and active status.
Clicking Add New, will take you to a screen where you can add a new custom page and its details.
|
|
|
|
|
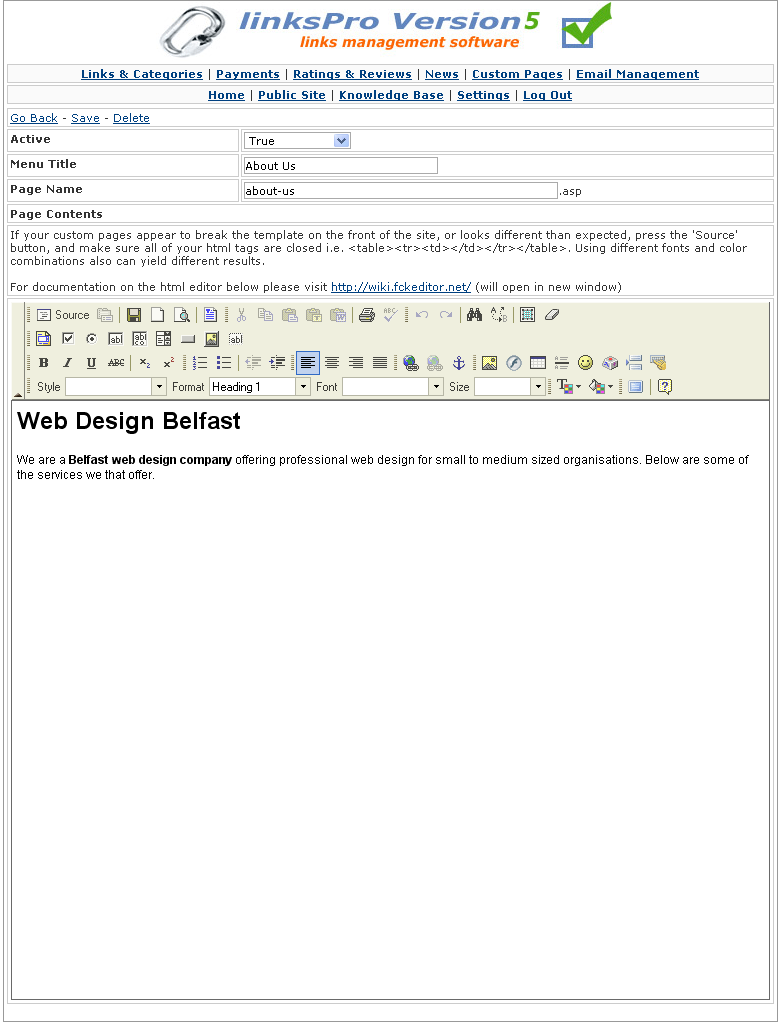
Allows you to add/edit custom pages.
Active
Activate or deactivate, if set to False, this will not be seen in the front of the directory, set to True it will be.
Menu Title
The menu title of the custom page, that will appear above the main menu in the front of the shop.
Page Name
The page name that this custom page will be stored in, this must be unique from all other page names for search engine optimization purposes.
Page Contents
The main content/body of the news item, a WYSIWYG html editor is provided for easy manipulation of graphics and layout, or you can just use simple text.
|
|
|
5. Email Management: Templates & Sending Bulk Email
|
|
|
|
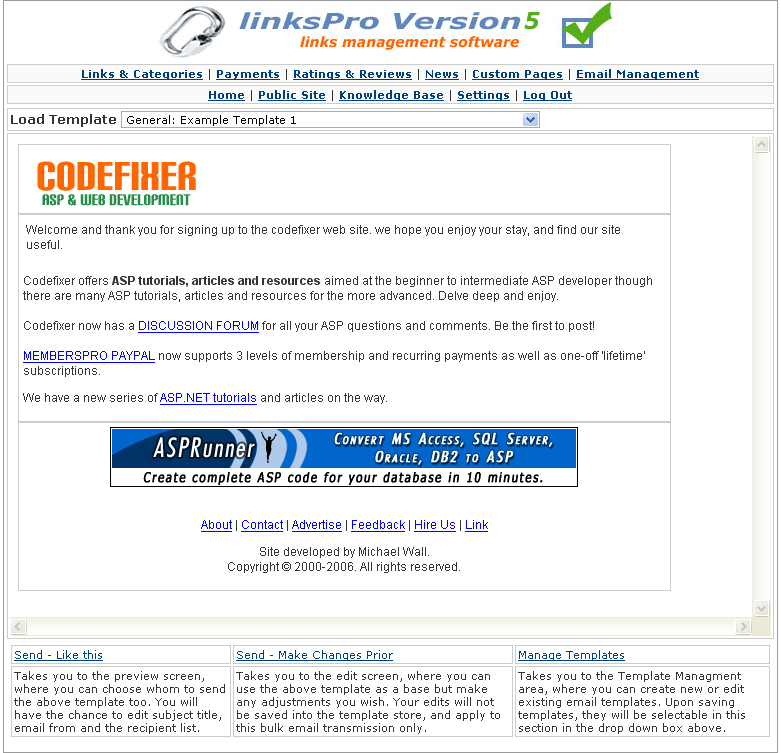
Allows you to select an email template from the template store/templates you have created. You can also go to the email templates list and edit/add new templates.
Selecting a template from the drop down for preview, then selecting 'Send - Like This' will take you to a further preview screen where you can select recipients and subject.
Send - Like This
Takes you to a preview screen where you can select the recipient list, subject and from email address, the latter and penultimate latter will auto populate, but you have the option to change prior to sending.
Send - Make Changes Prior
Takes the current template selected and allows you to make changes prior to sending. These changes won't be saved, this gives you an easy option to make none important minor changes to your templates prior to bulk mailing.
Manage Templates
Lists the email templates currently within the site, allowing you to edit existing or add new templates.
|
|
|
|
|
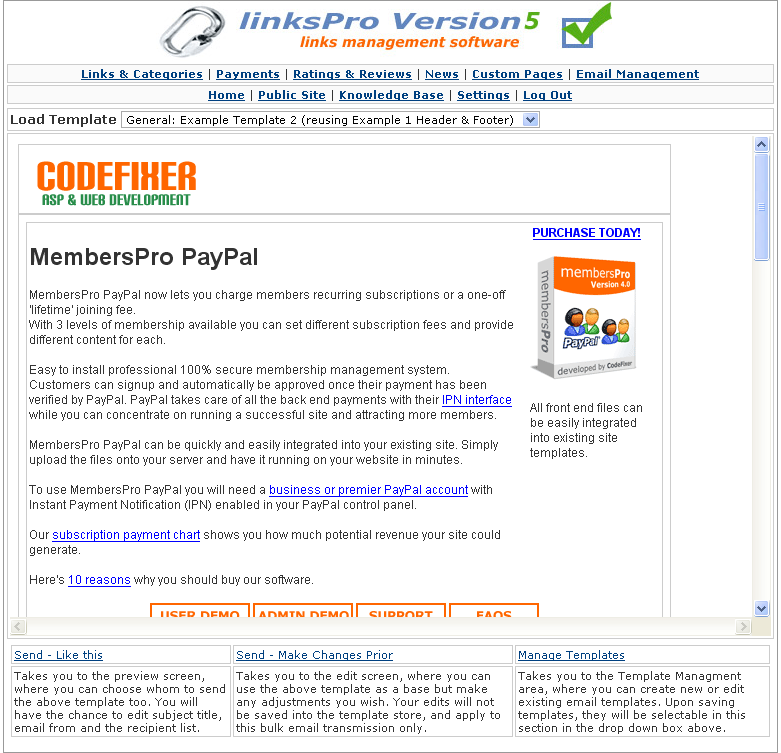
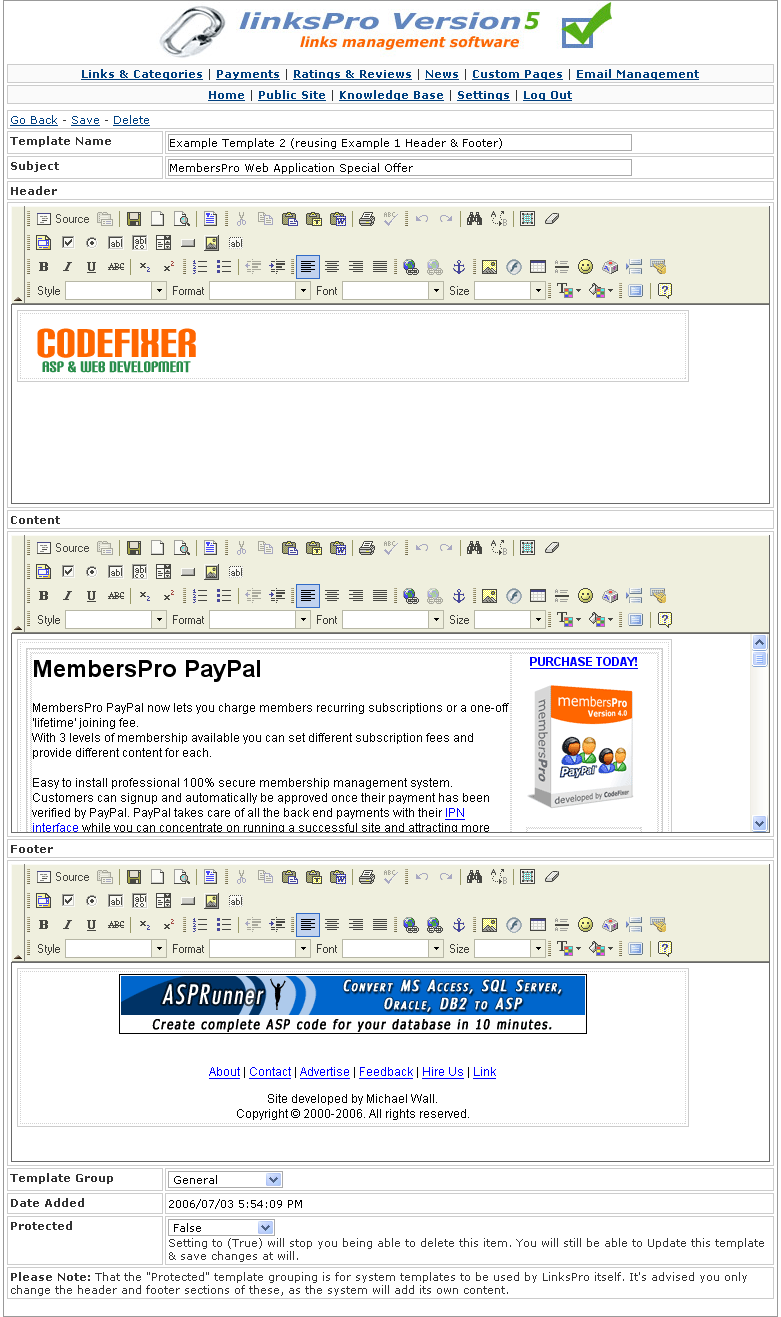
As Email Template Selection - example 1, showing a different template selected from the drop down. This demonstrates how easy it is to reuse existing templates, with the header, content, footer sections, you can cut and paste existing headers and footers, but change the content slightly to create entirely different bulk mails.
|
|
|
|
|
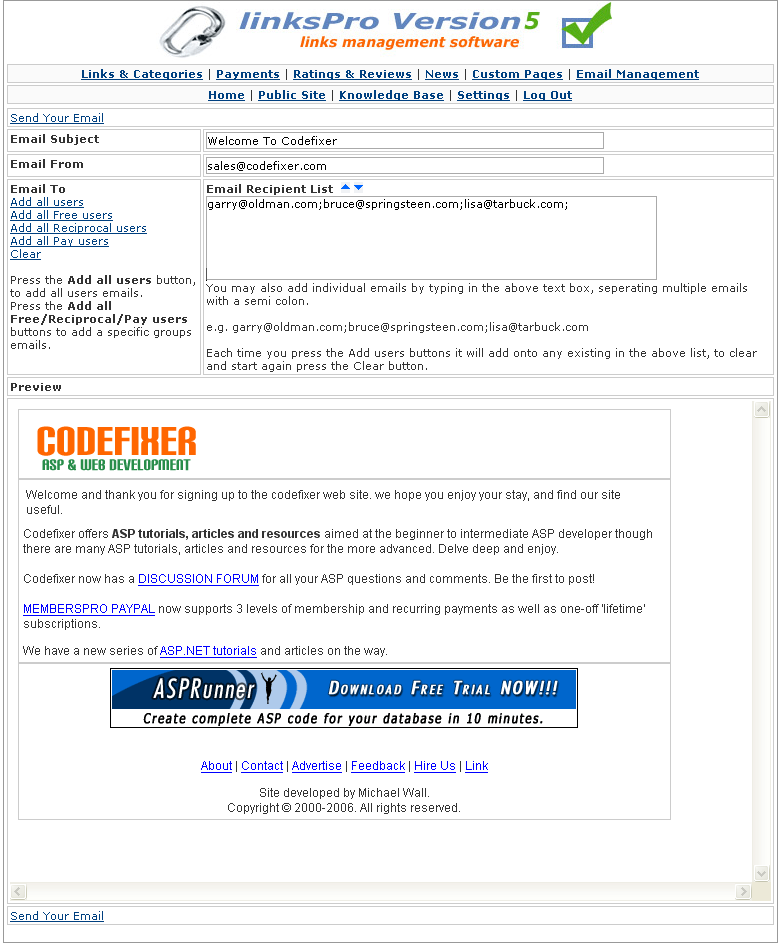
Shows the preview of your bulk email/template, prior to sending, and also allows you to select which people you wish to send it too.
Email Subject
Subject of the email you want to send, this will auto populate from the template, but editable freely at send time.
Email From
From address that will displayed in your bulk email. This is populated automatically from the site 'settings' values but is editable at send time.
Email To
The recipient list for this bulk email, you can separate emails with a semi colon i.e. ;
» Add All Users
Adds all email addresses of people who have submitted links to the site that are stored in the database.
» Add All Free Users
Adds all email addresses of all people who submitted links Free of charge.
» Add All Reciprocal Users
Adds all email addresses of all people who submitted links under the Reciprocal arrangement.
» Add All Pay Users
Adds all email addresses of all people who submitted links and Payed a fee.
» Clear
Clears the 'Email To' text area box.
Preview
Preview of how your bulk email will look.
Send Bulk Email
Send the bulk email to all of its recipients.
|
|
|
|
|
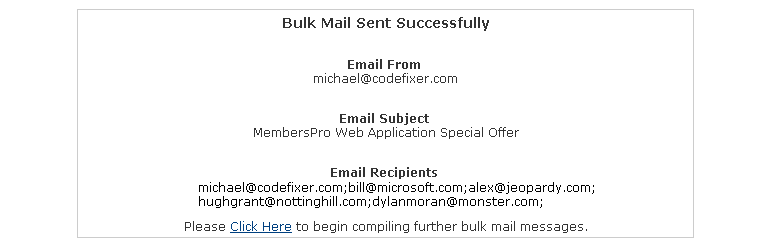
Confirms that the bulk email has been sent and the recipient list that have received it.
|
|
|
|
|
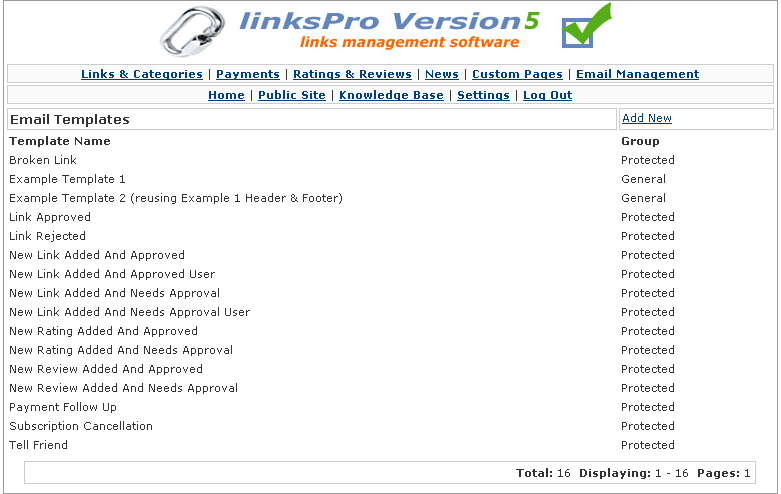
Lists the templates currently available within the site, templates with a 'protected' category grouping are system templates used for linkspro communication, you can edit these freely but please check results prior to mainstream use as the system may add further text/content.
Clicking anywhere along the email template line will take you to that templates details page, where you may alter template name, subject and other details.
Clicking Add New, will take you to a screen where you can add a new email template and its details.
|
|
|
|
|
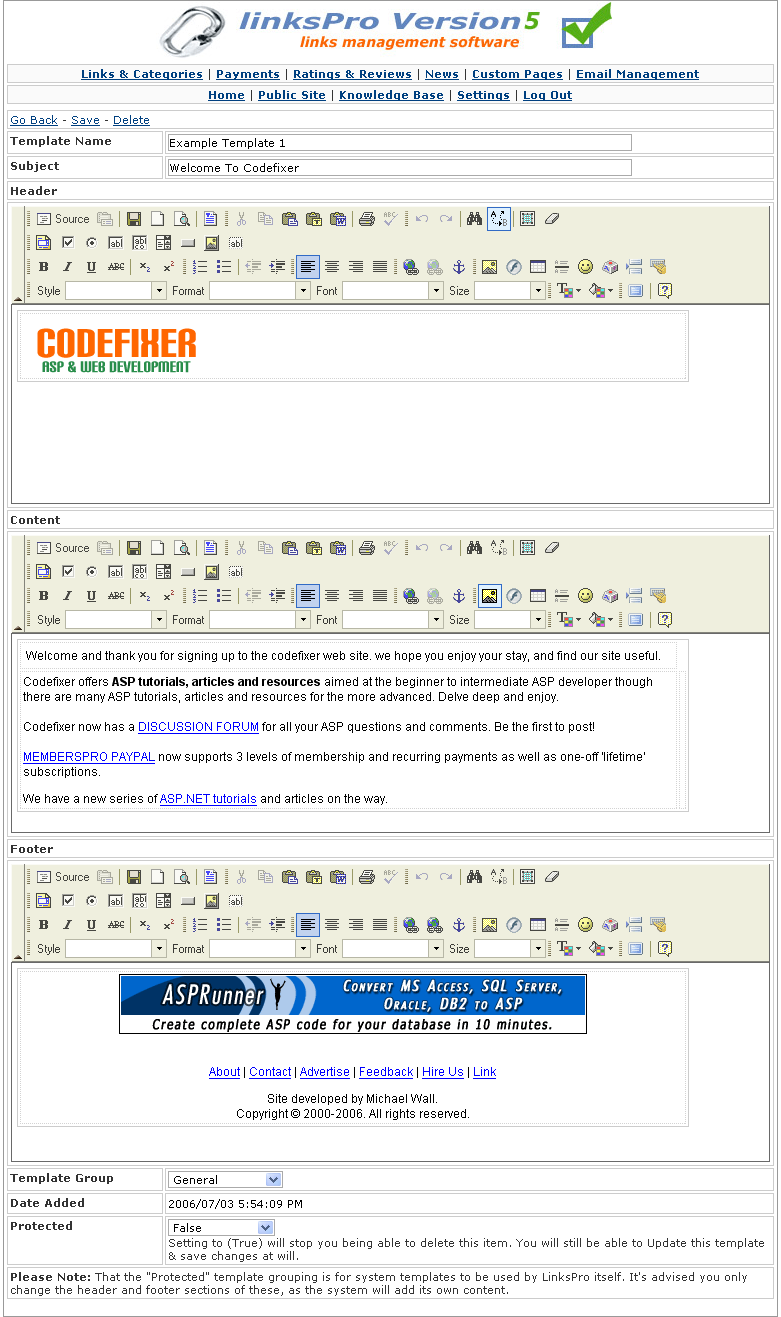
The email template allows you to create and store reusable emails for later use. It is divided into 3 sections: header, content and footer for easier management. These 3 sections will join together in the end email/template and form a standard html/web page document, these sections are divided for better management.
Template Name
Name of the email template.
Subject
Subject of the email template that will be sent out as default.
Header
Placing of style sheet, page setup and header graphics. This is often the most reused portion of a template as it sets up the entire page with as mentioned, a style sheet (css), header graphics as well as javascript functions, meta tags and a host of page requirements. Creating a header for your site is very efficient as it can be reused many times.
Content
This is where you communicate specific messages and content to your patrons and usually changes on a case per case basis. Examples are usually based on category e.g. general, sales, information, apology and special offers. In 'protected' templates, the system will add content to templates by default, but you can specify further content by editing these.
Footer
Signifies the closing thoughts of an email such as a Tag Line, copyright notice or set of site links.
Template Group
Category/grouping of this email template, place this template in the grouping that suites its purpose best.
Date Added
The date and time this was added/created.
Protected
Setting protected to True, will stop you being able to delete this template or change its grouping, and only allow you edit its name, subject and content.
|
|
|
|
|
As Email Template Add/Edit - example 1, showing a different template selected. This demonstrates how easy it is to reuse existing templates, with the header, content, footer sections, you can cut and paste existing headers and footers, but change the content slightly to create entirely different bulk mails.
|
|
|
|
|
|
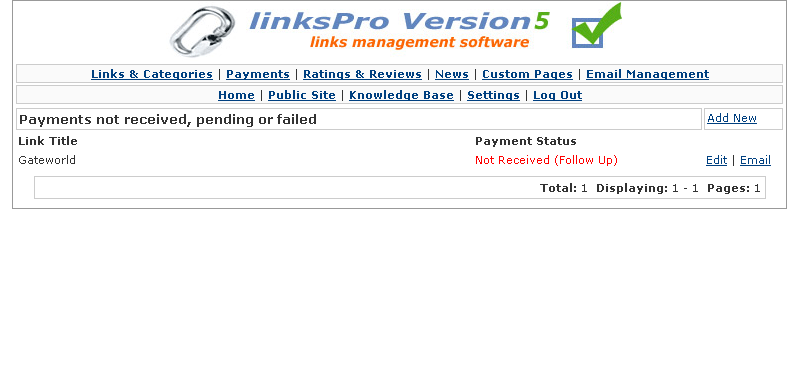
|
Lists all submissions that didn't complete the payment process. These submissions have been added to your site, but the customer withdrew from the payment process, or the customer had a problem with authentication.
Edit: Clicking edit will take you to the related link, from there you can Add Payment Details via a hyperlink, which is located near Link Mode / Payment Bracket.
Email: Click this to write the link owner an email, enabling you to follow up any incomplete submissions. The links contact email, will auto-fill on the last page of the send email process. You can alter the "Payment Follow Up" Email Template, which is called when you use this function to stop the need to type out repeat information each time.
|
|
|
|
|
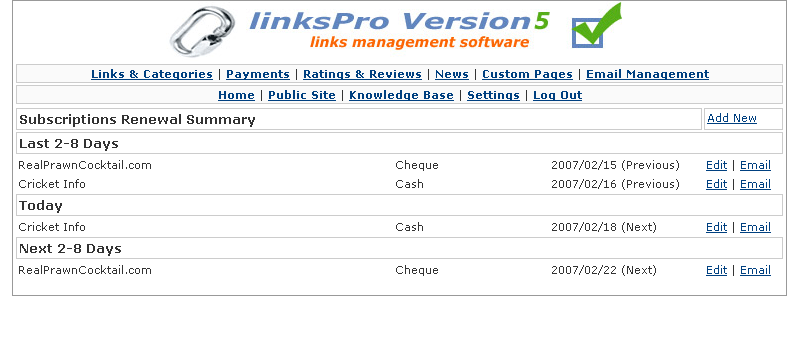
Lists recent renewal dates of any subscription payments. Use this section to ensure people are paying you on time or notifying people they have missed payments.
It will list the most 2 most recent dates, 1 previous/past and 1 next/upcoming of any particular subscription.
Edit: Clicking edit will take you to the related link, from there you can View Payment Details via a hyperlink, which is located near Link Mode / Payment Bracket.
Email: Click this to write the link owner an email, enabling you to follow up any incomplete submissions. The links contact email, will auto-fill on the last page of the send email process. You can alter the "Payment Follow Up" Email Template, which is called when you use this function to stop the need to type out repeat information each time.
|
|
|
|

|
Lists all subscriptions that have ended via cancellation, but are still set to active on your site. View this screen to deactivate all cancelled subscriptions.
Edit: Clicking edit will take you to the related link, from there you can set Active (and also Approved if you wish) to False, the link then will not be visible from the front of the site.
Email: Click this to write the link owner an email, enabling you to follow up any incomplete submissions. The links contact email, will auto-fill on the last page of the send email process. You can alter the "Payment Follow Up" Email Template, which is called when you use this function to stop the need to type out repeat information each time.
|
|
|
|
|
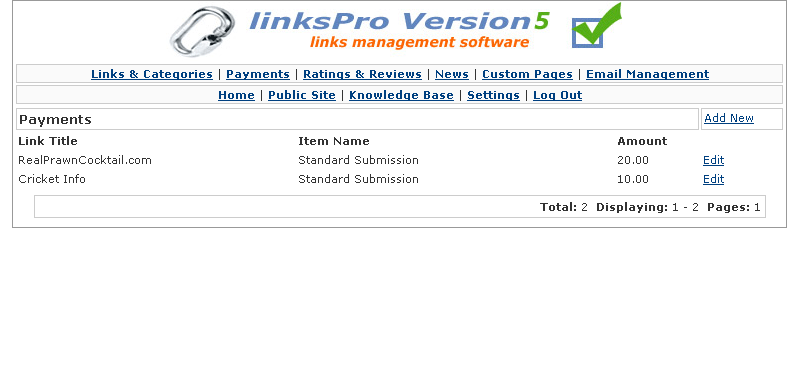
Shows a complete history of payments received by your site.
Edit: Clicking edit will take you to the related payment details, from there you can change any of the details for this payment, including recurring details, payment amount, description and the status.
|
|
|
|
|
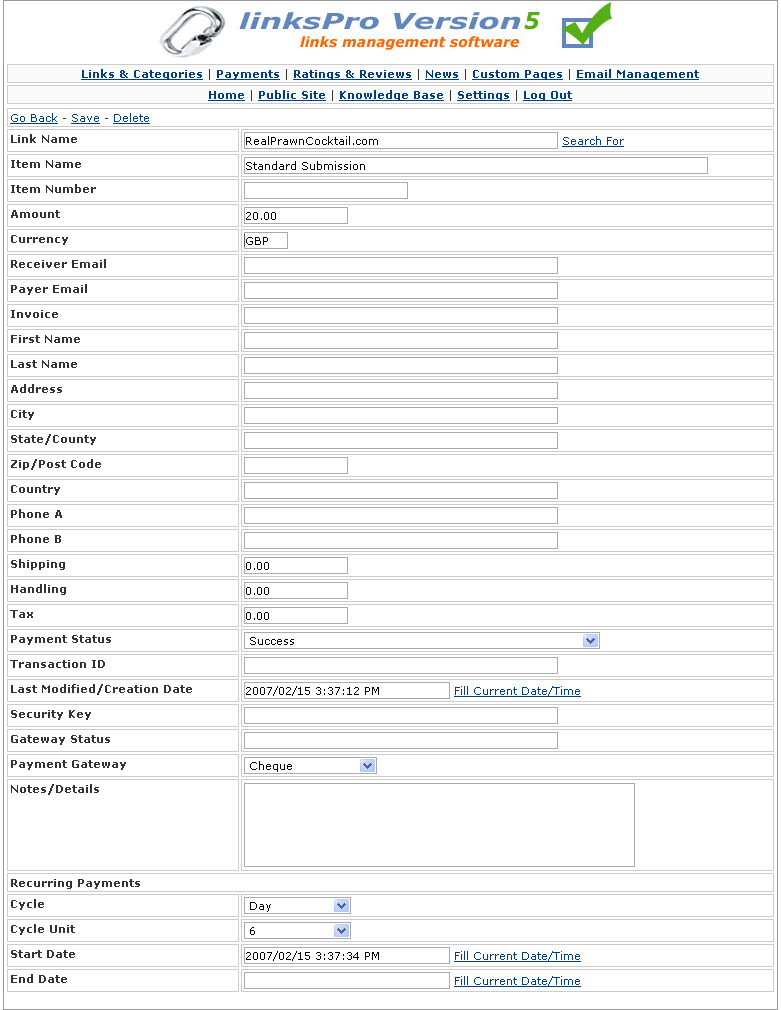
Link Name
The name of the link this payment applies to. Pressing the "Search For" hyperlink will allow you to search for links via a popup window.
Item Name
The short name of payment item - Standard Submission or Premium Submission will be seen here.
Item Number
A reference number that can be assigned to payment item, usually blank, can be used in your own referencing system if you have one.
Amount
Total amount/cost of this payment.
Currency
Currency Code of this payment.
Receiver Email
The email this payment was sent to, this ties in with what is stated in your configuration settings for a particular payment gateway. If you have entered in a manual transaction this field can be blank.
Payer Email
The email the customer used to pay with, or the email they reference as there contact email regarding any correspondence due to this payment.
Invoice
Invoice number/reference.
Contact Details
The below will be the contact details as posted back from an automated gateway or if you entered them manually.
» First Name
» Last Name
» Address
» City
» State/County
» Zip/Post Code
» Country
» Phone A
» Phone B
Shipping
This will usually be blank, unless you have manually entered a number here as part of a manual payment.
Handling
This will usually be blank, unless you have manually entered a number here as part of a manual payment.
Tax
This will usually be blank, unless you have manually entered a number here as part of a manual payment.
Payment Status
Identifies if the payment of this item, is active or stopped or awaiting authorization.
» Success
One off payment or Subscription is Active
» Pending
Used for a manual payment, by post - or a payment gateway has still not fully processed the funds from the customer.
» Fail
The gateway failed to authorize payment.
» Sub-Cancel
The subscription was cancelled.
Transaction ID
A unique transaction ID often past by the automated payment provider.
Last Modified/Creation Date
Creation date of this payment, or if you have updated it you can also fill in a new date for your references.
Security Key
A security key is past back by some providers such as Nochex, can however be used for other transaction references.
Gateway Status
The status of the payment gateway, for instance Live or Test transaction, usually blank other than Nochex transactions, this can be used for other references as you see fit.
Payment Gateway
The method in which this payment was received, from automated gateways or manual payments via post.
» PayPal
Automated Payment Gateway - Multiple Currencies - Recurring billing.
» Nochex
Automated Payment Gateway - UK Pounds only.
» Cash
Accept cash by post from customers.
» Cheque
Cheque by post from customers.
» Bank Transfer
Bank Transfers direct from customers bank accounts to your own.
» Credit/Debit Card
Process customers credit and debit cards using your own in-house credit systems.
Notes/Details
Add in any extra details or notes on this payment.
Recurring Payments
Extended settings to allow recurring billing/subscriptions on your site.
Cycle
Day, Week, Month or Year - Specifies the period in which a subscription occurs.
Cycle Unit
How many Days, Weeks, Months or Years between payments off a subscription.
Start Date
The beginning date of the subscription.
End Date
The last date of the subscription.
|
|
|
7. Configuration Settings
|
|
|
|
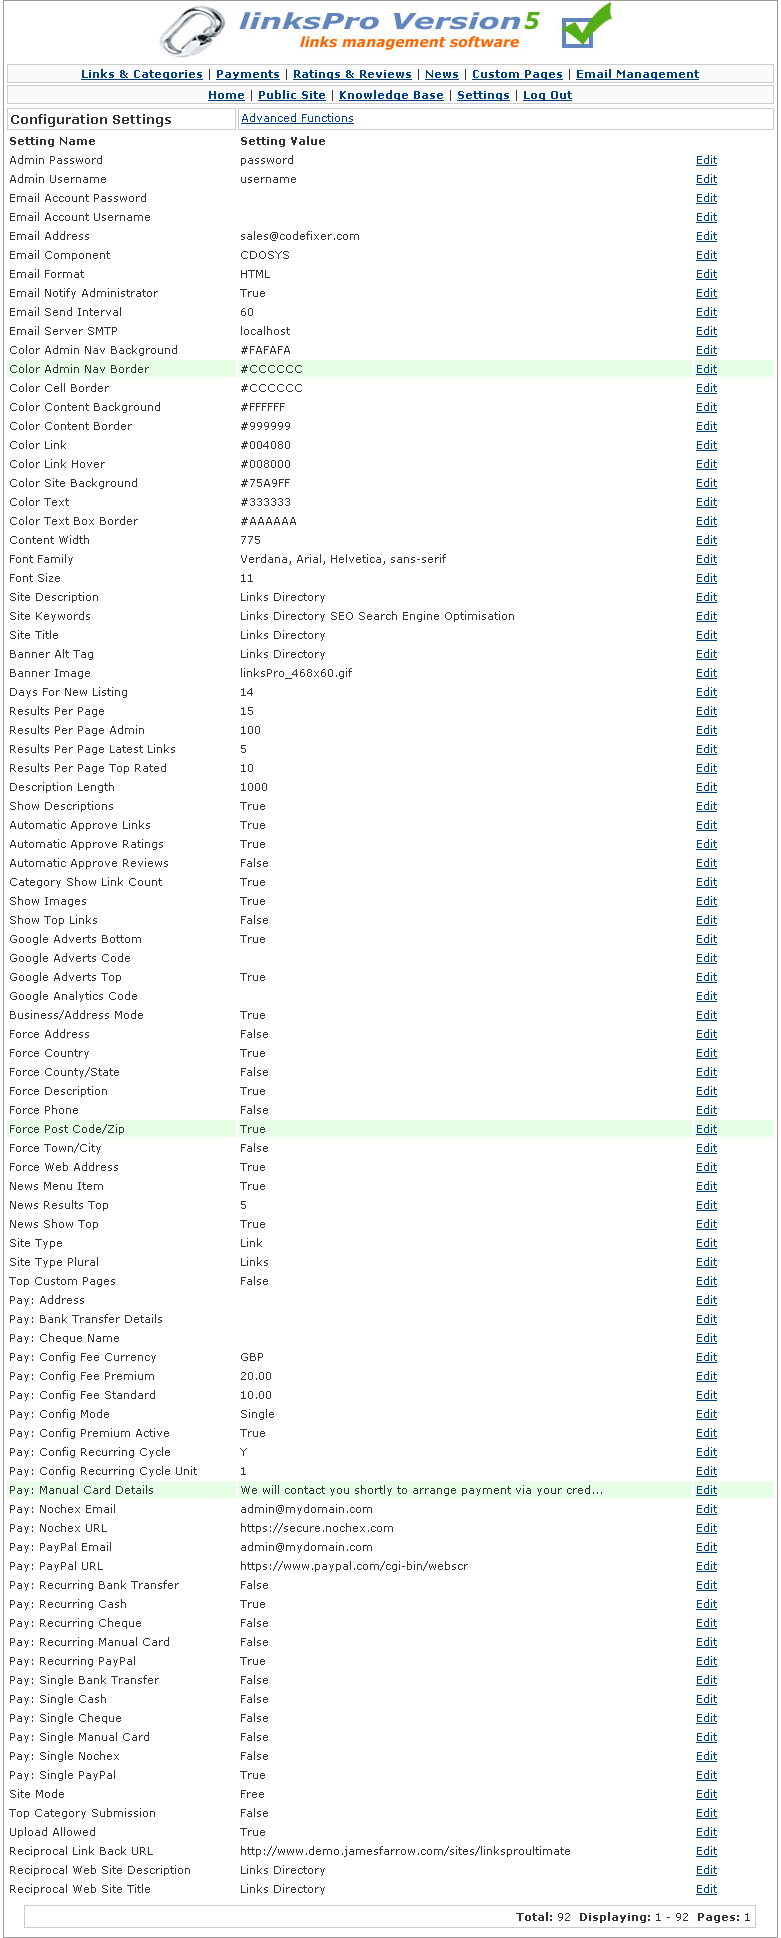
Lists the current settings which govern the sites operation. Hover your mouse over each setting for a partial description.
Clicking edit or anywhere along the setting line will take you to that settings details page, where you may alter the settings value, and view a full description of the settings usage.
|
|
|
|

|
Please read each of the settings's descriptions, for full information on how to use each one. On-screen information will be explain what the various settings are for, and many will have drop down boxes which carry example values for you to use.
Setting Variable
Variable used to identify this setting, used in the code that governs the site, not important unless you are expanding or changing the linkspro application.
Setting Name
Name of the setting.
Example Settings
List of examples for this setting in a drop down box, selecting a setting here will change the 'setting value' below, this can be edited further.
Setting Value
Value of this setting, the element which is most important.
Description/Usage
Description and possible examples of how to use this setting.
|
|
|
|
|
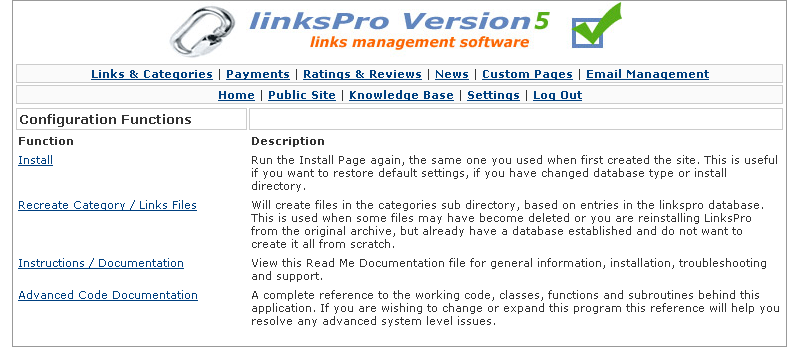
Allows you to re-install the site, change the directory location and database connect string, recreate directory structure and view advanced technical documentation.
Please read on screen documentation for further information.
|
|
|
8. How Do I...
|
|
|
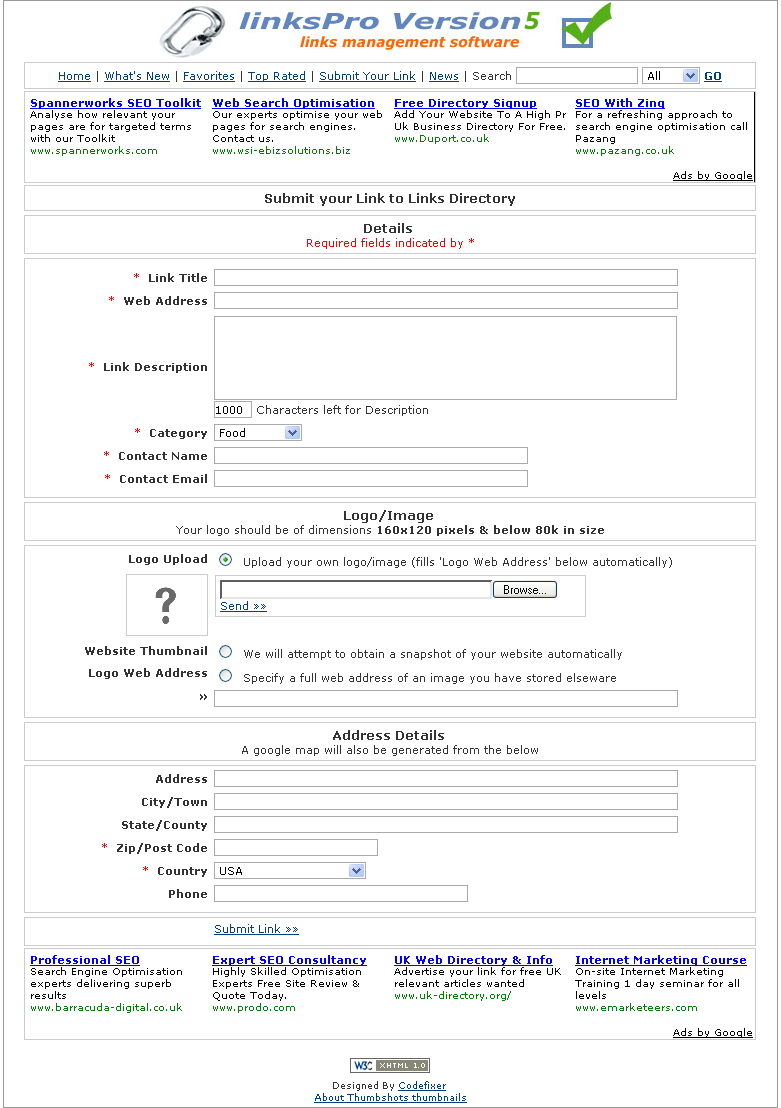
An example of what the front of your site might look like when Business/Address Mode is turned on.
|
Change the following Configuration Settings
» Business/Address Mode = True
This will turn on addressing and map information, which will be visible in the details section and required by people when submitting a link/business.
Decide on
Force Settings
Which fields/information you want to force people to provide when they submit to your directory.
» Force Address
» Force Country
» Force County/State
» Force Description
» Force Phone
» Force Post Code/Zip
» Force Town/City
» Force Web Address
Site Word Settings
Change the word your site uses to describe its content, by default it is "Link" and "Links". If your running a business directory, you may wish to change it to "Business" or even specifically the type of business such as "Restaurants".
» Site Word - the singular term for your site content e.g. Business
» Site World Plural - the plural term for your site content e.g. Businesses
|
|
|
|
Change the following Configuration Settings
» Site Mode = Free
Decide on
Top Category Submission
Allow people to submit to top of directory? or reserve it for yourself for special promotions? If in free mode, be aware people may swamp the top category for maximum exposure.
Important: If you turn on Top Category Submission, you must also turn on Show Top Links, so they are visible once submitted.
» Top Category Submission = True
» Show Top Links = True
Upload Allowed
Do you want users to be able to upload there own images/logos to associate with their submission?
Important: If you turn on Upload Allowed, you should also turn on Show Images, so images are visible in the listings.
» Upload Allowed = True
» Show Images = True
|
|
|
|
Change the following Configuration Settings
» Site Mode = Reciprocal
Decide on
Reciprocal Settings
Three important settings should be reviewed, they govern how people will link back to your site.
» Reciprocal Link Back URL
The web address that you want other sites to point to, this will generally just be the web site address of your directory, however it can be changed to wherever you require, i.e. "http://www.codefixer.com"
e.g. Codefixer Software - ASP Tutorials
» Reciprocal Web Site Title
The short description that will appear in the Link, i.e. "Codefixer Software"
e.g. Codefixer Software - ASP Tutorials
» Reciprocal Web Site Description
The description that will sit next to the link, i.e. "- ASP Tutorials"
e.g. Codefixer Software - ASP Tutorials
|
|
|
|
Change the following Configuration Settings
» Site Mode = Pay
» Pay: Config Mode = Single
Decide on
Pay Configuration Settings - Critical
» Pay: Config Fee Currency
Choose the currency you wish payments to be in.
Note: Nochex only accepts GBP, so if you choose a different currency, Nochex will not be available via drop downs on the submission screen, irrespective of its active status in the settings.
USD = US Dollars
GBP = Pounds
EUR = Euros
AUD = Australian Dollars
CAD = Canadian Dollars
JPY = Japanese Yen
» Pay: Config Fee Standard
The amount you are charging for submissions to your site.
Premium Submission Charging - Pay: Config Premium Active
Charge a premium rate for submissions to the top of your site, where maximum exposure is required.
Important: If you turn on Premium Active, you must also turn on Top Category Submission, Show Top Links and set a numeric value for Pay: Config Fee Premium.
» Pay: Config Premium Active = True
» Top Category Submission = True
» Show Top Links = True
» Pay: Config Fee Premium = 20.00
Payment Methods
Choose which methods you want to accept one off payments via. Recommend you use Paypal to begin with and possibly Nochex if in the United Kingdom.
» Pay: Single Bank Transfer
Also enter information into Pay: Bank Transfer Details (account details) & Pay: Address (address to post to)
» Pay: Single Cash
Also enter information into Pay: Address (address to post to)
» Pay: Single Cheque
Also enter information into Pay: Cheque Name (cheque payable too) & Pay: Address (address to post to)
» Pay: Single Manual Card (using your own credit facilities)
Also enter information into Pay: Manual Card Details (how you will arrange to contact them for payment)
» Pay: Single Nochex
Also enter information into Pay: PayPal Email (PayPal account email)
» Pay: Single PayPal
Also enter information into Pay: Nochex Email (Nochex account email)
Payment Provider Emails
If using PayPal or Nochex, enter your email that is associated with your PayPal/Nochex account.
» Pay: PayPal Email
» Pay: Nochex Email
|
|
|
|
|
Note: Please read the previous chapter 8.4 Let people pay to submit to my site? fully, before continuing with this section.
|
Change the following Configuration Settings
» Site Mode = Pay
» Pay: Config Mode = Recurring
Decide on
Everything should be setup very similar to 8.4 Let people pay to submit to my site? there are some differences however, instead of setting Pay: Single settings, you need to set Pay: Recurring settings as to which methods of payment you are allowing users to pay via.
Pay: Config Recurring Cycle
Which period of recurring billing do you want to occur? i.e. Day, Week, Month or Year.
Pay: Config Recurring Cycle Unit
What interval do you want the recurring billing to occur? i.e. 1, 2, 5, 20, 30?
e.g. Every 5 Days? Every 1 Year? Every 3 Months?
Payment Methods
Choose which methods you want to accept recurring payments via. Recommend you use Paypal to begin with, Nochex doesn't have recurring capability.
» Pay: Recurring Bank Transfer
Also enter information into Pay: Bank Transfer Details (account details) & Pay: Address (address to post to)
» Pay: Recurring Cash
Also enter information into Pay: Address (address to post to)
» Pay: Recurring Cheque
Also enter information into Pay: Cheque Name (cheque payable too) & Pay: Address (address to post to)
» Pay: Recurring Manual Card (using your own credit facilities)
Also enter information into Pay: Manual Card Details (how you will arrange to contact them for payment)
» Pay: Recurring Nochex
Also enter information into Pay: PayPal Email (PayPal account email)
» Pay: Recurring PayPal
Also enter information into Pay: Nochex Email (Nochex account email)
|
|
|
Terms & Conditions of use
|
|
9. End-User License Agreement
|
IMPORTANT-READ CAREFULLY: This End-User License Agreement ("EULA") is a legal agreement between you (either an individual or a single entity) the end user ("Licensee") and Codefixer the ("Licensor") for the Codefixer.com software product accompanying this EULA, which includes computer software and may include associated media, printed materials, and "online" or electronic documentation. By installing, copying, or otherwise using the software product, you agree to be bound by the terms of this EULA. If you do not agree to the terms of this EULA, do not install, copy, or use the software product.
|
|
|
|
Copyright laws and international copyright treaties as well as other intellectual property laws and treaties protect the software product. The software product is licensed, not sold.
|
|
|
|
Codefixer hereby grants to the licensee a worldwide, limited, non-exclusive, non-transferable license (without the ability to sub-license) to use this product on a SINGLE web site or if a multi-site license has been purchased to use on multiple sites. The licensee may make copies of the software for backup purposes only.
|
|
|
|
This license shall have no effect unless and until the licensee submits all applicable and appropriate license fees to Codefixer.
|
|
|
|
Codefixer warrants that for 1 year following delivery of the software to the licensee, the software unless modified in any way by the licensee will perform substantially according to the functions described in any associated product documentation provided by Codefixer. Codefixer does not warrant that the software will meet the licensee's specific requirements. Codefixer is not responsible for any problem which would otherwise be a breach of warranty, caused by changes in the operating characteristics of computer hardware of computer operating systems, or interaction of the software with software not supplied or approved by Codefixer, or accident, abuse or misapplication.
|
|
|
|
In case of a breach of limited warranty the licensee's sole remedy under the foregoing warranty during the warranty period is that Codefixer shall, at it's sole and exclusive option, either use reasonable efforts to correct any reported deviation from the relevant product documentation, replace the software with a functionally equivalent program, or refund all license fees paid, in which case this license shall immediately terminate. Any repaired or replaced software will be re warranted for an additional ninety day period, unless subsequently modified by the licensee.
|
|
|
|
|
Under no circumstances shall Codefixer be liable to the licensee for any damages, including compensatory, special, incidental, exemplary, punitive or consequential, connected with or resulting from this license agreement or the licensee's use of this software.
|
|
|
|
|
This license is effective until terminated. This license may be terminated by the non-defaulting party if either party materially fails to perform or comply with this license or any provision of it. In the event that Codefixer terminates the license, the licensee must destroy all copies of the software product and all of its component parts.
|
|
|
|
|
All title and copyrights in and to the software product (including but not limited to any images, photographs, animations, video, audio, music and text incorporated into the software product), the accompanying printed materials, and any copies of the software product are owned by Codefixer or it's suppliers. The software product is protected by copyright laws and international treaty provisions. Therefore, you must treat the software product like any other copyrighted material.
|
|
|
|
Limitations on Reverse Engineering and Disassembly.
You may not reverse engineer, or disassemble the software product, except and only to the extent that applicable law notwithstanding this limitation expressly permits such activity.
Rental.
You may not sell, rent, or lease the software product.
Software Transfer.
You may permanently transfer all of your rights under this EULA, provided you retain no copies, you transfer all of the software product (including all component parts, the media and printed materials, any upgrades, this EULA, and the recipient agrees to the terms of this EULA.
|
|
|
|
|
Unless you purchase your own license from Thumbshots Thumbnails, you are legally obliged to keep the hyperlink at the bottom of the pages on this site.
|